The DIY Fix is reader supported. When you buy after clicking a link on our site, we may earn an affiliate commission.
The first thing anyone should do when they find rising damp, is to come up with a solution to fix it. If you let this kind of problem go untreated, it can progress into a more serious issue.
Rising damp doesn’t just damage paint, wallpaper, and skirting boards. Over longer periods of time it has the potential to cause structural issues, such as damage to bricks and the rotting of structural timbers.
As with any type of damp in your home, there are DIY damp proofing techniques which you can carry out yourself. Alternatively, you can hire a professional to do the work for you.

But how simple is it to fix? Can you just paint over rising damp with a decent damp proofing paint?
Unfortunately treating rising damp can not be solved by simply painting over it. This will not solve the problem. Even the best damp proofing paints will only mask the problem.
To stop rising damp you need to fix the underlying issue, then a damp proof paint can be used as a secondary measure to add a further layer of protection
Why you can’t just paint over rising damp
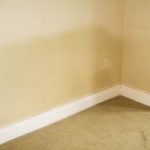
When damp rises into your property, one thing you will often notice is unsightly tide marks on the wall. At this point, many peoples first reaction is to paint over the stains on their internal walls.
The problem is a standard emulsion will do absolutely nothing to prevent damp from showing through your walls. In fact, damp will usually start to penetrate through normal paints in a matter of days.
But what about paints designed specifically to deal with damp? Surely this type of paint will get the job done, right? Wrong!
Damp proof paints can do a fantastic job when used in the right circumstances. However, rising damp is a little more serious. If you don’t stop it at its source, it will just continue to rise into the property.
As moisture builds up behind the surface of the wall, it will eventually find its way around your paint job.
Also, leaving a large amount of moisture trapped in your walls, can lead to structural problems over time.
Issues could include things like spalling bricks, and moisture seeping into structural timbers resulting in mould and rot.
Really, when you paint over rising damp, all you are doing is time shifting the problem into the future. Not only that, but you are probably making the issue even worse. This will make the end problem more difficult and expensive to fix later.
Fixing rising damp before you paint
Whilst a damp proof paint can’t solve rising damp on its own, it can be used as part of a solution. We will come to this shortly.
The reason damp can rise into your property, is due to an issue with your damp proof course. The damp proof course (or DPC) is a barrier that stops moisture from traveling up through your home from the ground.
In modern properties a plastic sheet of DPC is the most common method. This is usually made from polyethylene and is placed in the mortar joint approximately 150mm above external ground level.
In older properties, less porous building materials were used, such as slate, or a course of engineering bricks which are impervious to damp.
If your damp proof course fails, this can allow water to get through and rise above the DPC.
This means that you need to repair or replace the damp proof course to stop the damp from rising. At this point you have a few choices.
- You can remove bricks and physically add a new DPC. This option involves work to the structure of your property and should be carried out by a competent professional.
- You can inject a chemical DPC. This is a popular option as it does not involve any structural alterations. You simply drill holes and inject the new chemical DPC.
If you opt for option two, there are DIY solutions, or you can hire a professional to do the work. Either way, injecting your new damp proof course tends to be far easier and more cost effective.
Using damp proof paint as a secondary treatment
Once your new DPC is installed, there should be no more issues with new cases of rising damp. However, you will still have the problem of damp walls. The moisture will still be trapped inside and this issue needs resolving before cosmetic improvements are carried out.
Fully drying out the walls can take some time. You should allow at least a few weeks after the treatment to let walls fully breathe and the moisture to evaporate.
If you remove old wet plaster, you should also leave the bricks exposed during this time to allow water to escape from the brickwork.
Make sure the area is well ventilated and extract extra moisture with the use of a dehumidifier. You can also use your central heating to help speed up the drying process.
If you want to take extra steps to make sure the wall is dry, you can use a damp proof meter to test the moisture content. You can find affordable meters for as little as £20 that can do this job for you.
You can read more about good DIY damp proof meters here.
Once you are happy the wall is dry you can start to redecorate. This is when your damp proof paint can come in handy.
Drying your walls can be a long process and it is unlikely you will remove all the moisture. This means that some water and salts will remain trapped in the masonry. This has the potential to penetrate through later.
A damp-proof paint can be used as a barrier to stop this moisture and salts (which can stain your walls) from escaping.
Many damp paints can be used as the main finish or you can choose to paint over with a standard emulsion.
At this point you should have done the following:
- Completely stopped rising damp with a new DPC
- Fully dried out the walls, removing as much moisture as possible (test this with a meter)
- Added a secondary layer of protection with a damp proof paint.
Once you have completed these steps, you should no longer have any issues with rising damp for the foreseeable future.
What if you need help doing the work?
Most of this work can be done by a competent DIY’er. However, if you are not completely confident, it is advised that you hire a damp proofing specialist.
In our experience, the best way to do this is using comparison websites to find a local contractor. The advantage with this, is you can get multiple quotes and all the companies are rated and verified by the comparison service.
Another advantage is you can see past customer reviews and the company’s qualifications and certifications.
Finally, it tends to be cheaper. All the damp proofing companies are competing for the work, so prices can be significantly lower.
To check out the best damp proofing comparison site and get up to 5 local quotes Click Here
Conclusion
The important thing to remember, is that you can rarely just paint over damp problems. This might work with some minor damp issues and it can often work as a temporary fix. However, you should always try to fix the root cause of the problem first.
If you don’t solve the underlying issue first, it is highly likely the damp will return at some point and no amount of damp proof paint will fix this.
If you do the job right first time you should only need to do the work once.